Stencil testing refers to a technique in computer graphics programming which allows conditional processing of fragments. Stencil testing is closely related to depth testing which is used to determine which fragment precedence based on its depth within the scene. In fact both tests are handled through the very same interface in WebGPU. The tests are handled through the Depth/Stencil State.
In this post we are focusing on a specific implementation of the WebGPU specification called wgpu. It is a safe and portable GPU abstraction in Rust which implements the WebGPU API. Generally, the technique described below will also work for other implementations of WebGPU like it will be available in JavaScript.
What is Stencil Testing?
After the execution of the fragment shader, a so-called “Stencil Test” is performed. The outcome of the test determines whether the pixel corresponding to the fragment is drawn or not.
This test uses information from the current draw call, as well as contextual information which is encoded in a stencil buffer. The stencil buffer is a 2D texture of shape (Screen Width, Screen Height). Each stencil value within the buffer usually has 8 bits. Initially the stencil buffer is initialized with zeros.
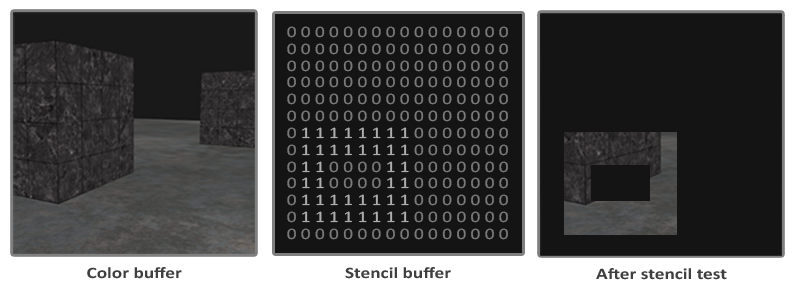
The Figure below shows the result of the fragment shader (Color buffer), a stencil buffer and the result after applying the stencil buffer.
From an abstract perspective the stencil test can be seen as the following function which is executed per screen pixel. While graphics programmers can not implement this directly, this function should serve as a mental model.
1type StencilValue = u8;
2fn stencil_test(x: u32, y: u32,
3                stencil_state: &StencilFaceState,
4                stencil_buffer: &mut [[StencilValue;SCREEN_HEIGHT];SCREEN_WIDTH],
5                reference_value: StencilValue,
6                write_mask: StencilValue, read_mask: StencilValue) -> bool;
The function returns for each pixel with screen coordinates x and y whether it should be drawn or not. The stencil_state holds the configuration for the stencil test.
There is also a reference_value which is supplied with each draw in WebGPU.
Note that the stencil_buffer is mutable, which means that the function stencil_test is allowed to update the stencil buffer during the test. In fact executing a stencil test is the only way to update the stencil buffer. write_mask and read_mask are special values which will be covered later when.
The configuration of a wgpu::StencilFaceState in WebGPU essentially defines the implementation of the stencil_test function. Let’s see now how we can configure stencil testing in WebGPU.
WebGPU Pipeline Configuration
In WebGPU rendering is configured though pipeline descriptor. The wgpu::RenderPipelineDescriptor holds the blueprint for creating a pipeline. Let’s review some code which includes the gist of the configuration of a stencil buffer.
The majority of the values below are excluded as they are not important for stencil testing. I also excluded settings for depth testing as this is not the topic of this blog post. It is noteworthy though that depth testing interferes with stencil testing. WebGPU also combines the configuration of both via a single state.
 1let stencil_state = wgpu::StencilFaceState {
 2    compare: wgpu::CompareFunction::Always,
 3    fail_op: wgpu::StencilOperation::Keep,
 4    depth_fail_op: wgpu::StencilOperation::Keep,
 5    pass_op: wgpu::StencilOperation::IncrementClamp,
 6};
 7
 8wgpu::RenderPipelineDescriptor {
 9    ....
10    depth_stencil: Some(wgpu::DepthStencilState {
11        format: wgpu::TextureFormat::Depth24PlusStencil8,
12        depth_write_enabled: ...,
13        depth_compare: ...,
14        bias: ...,
15        stencil: wgpu::StencilState {
16            front: stencil_state,
17            back: stencil_state,
18            // Applied to values being read from the buffer
19            read_mask: 0xff,
20            // Applied to values before being written to the buffer
21            write_mask: 0xff,
22        }
23    })
24}
-
In line 11 a pixel format for the stencil testing is defined. Because depth and stencil testing have similar goals the context of both tests is stored in a single texture. In this case we define that every pixel uses 24 bits for the depth buffer and 8 bit for the stencil buffer.
-
Lines 16-21 two
wgpu::StencilFaceStatefor stencil testing:frontandback. It is possible to define two different stencil states depending on which side of a triangle is rendered. For this example we choose the same for both sides.We also define
read_maskandwrite_maskwhich will be used during the stencil test. -
Lines 2-5 define the logic behind the stencil test. In the next part I will show how these options determine the output of the stencil test by providing an imaginary implementation.
During the rendering loop you have to attach a depth_stencil_attachment like shown below in lines 5-8. The stencil_ops determines whether the stencil buffer will be cleared with a defined value at the beginning of the render pass, or the buffer of the previous pass will be loaded. At the time of writing, I’m unsure what the impact of the store flag is.
You also have the possibility to set a reference stencil value reference_value like shown here:
 1let mut pass = encoder.begin_render_pass(&wgpu::RenderPassDescriptor {
 2    ...,
 3    depth_stencil_attachment: Some(wgpu::RenderPassDepthStencilAttachment {
 4        ...,
 5        stencil_ops: Some(wgpu::Operations {
 6            load: wgpu::LoadOp::Clear(0),
 7            store: true,
 8        }),
 9    }),
10});
11
12let mut pipeline: &wgpu::RenderPipeline = ...;
13let mut vertex_buffer: wgpu::BufferSlice = ...;
14pass.set_pipeline(&pipeline);
15pass.set_vertex_buffer(0, vertex_buffer);
16pass.set_stencil_reference(some_reference_value);
17// Draw something
18pass.draw(0..3, 0..1);
We have now covered the WebGPU API which is responsible for stencil buffers. There are no other functions you need to know of! We need to get now an idea what the configuration does!
Imaginary Implementation for Stencil Testing
The following imaginary implementation of the stencil_test function should serve you as a mental model. By reading this function carefully you should be able to understand what the configuration of the wgpu::StencilState or call to pass.set_stencil_reference(...) does. If you understand the implementation below, then you also know what WebGPU will render given a specific stencil state.
 1/// Tests whether the fragment at `x` and `y` should be drawn or not. It also updates the stencil_buffer if required by the `stencil_state`.
 2fn stencil_test(x: u32, y: u32,
 3                // This state is either the `front` or `back` state supplied by the `wgpu::StencilState` config.
 4                stencil_state: &StencilFaceState,
 5                stencil_buffer: &mut [[StencilValue;SCREEN_HEIGHT];SCREEN_WIDTH]
 6                // stencil value with value provided in most recent call to RenderPass::set_stencil_reference.
 7                reference_value: StencilValue,
 8                // These two masks come from the `wgpu::StencilState` config
 9                write_mask: StencilValue, read_mask: StencilValue) -> bool {
10    // Read from the stencil buffer
11    let current_value = stencil_buffer[x][y] & read_mask;
12
13    // Does the current value pass the stencil test?
14    let does_pass = match stencil_state.compare {
15        Never =>  false,
16        Always =>  true,
17        Less => current_value < reference_value,
18        Equal => current_value == reference_value,
19        LessEqual => current_value <= reference_value,
20        Greater => current_value > reference_value,
21        NotEqual => current_value != reference_value,
22        GreaterEqual => current_value >= reference_value,
23    }
24
25    stencil_buffer[x][y] = write_mask & new_stencil_value(
26        current_value, reference_value,
27        if does_pass { stencil_state.pass_op } else { stencil_state.fail_op }
28    );
29
30    return does_pass;
31}
32
33/// Gets an updated stencil value according to `reference_value`
34fn new_stencil_value(current_value: StencilValue,
35                     reference_value: StencilValue,
36                     operation: &StencilOperation) -> StencilValue {
37    match operation {
38        Keep => current_value,
39        /// Set stencil value to zero.
40        Zero => 0,
41        /// Replace stencil value with value provided in most recent call to set_stencil_reference.
42        Replace => reference_value,
43        /// Bitwise inverts stencil value.
44        Invert => !current_value,
45        /// Increments stencil value by one, clamping on overflow.
46        IncrementClamp => if (current_value != 255) { current_value + 1 } else { current_value },
47        /// Decrements stencil value by one, clamping on underflow.
48        DecrementClamp => if (current_value != 0) { current_value - 1 } else { current_value },
49        /// Increments stencil value by one, wrapping on overflow.
50        IncrementWrap => current_value + 1,
51        /// Decrements stencil value by one, wrapping on underflow.
52        DecrementWrap => current_value - 1
53    }
54}
A minor simplification is that I excluded the depth_fail_op of wgpu::StencilFaceState. This operation is executed instead of fail_op if the depth test failed.
Clipping Objects using Stencil Testing
One usage for stencil testing is clipping of geometries. Let’s image for example we currently render a complex shape. We now notice that the complex shape is too big, and we want to clip it with another geometry.
This can be achieved by creating two separate pipelines in WebGPU. One pipeline draws a mask against which we want to clip the geometry. The other pipeline draws the actual complex shape. We draw now a mask in the stencil buffer by using the following draw calls:
1let mut pass: wgpu::RenderPass = ...;
2let mut mask_pipeline: &wgpu::RenderPipeline = ...;
3let mut vertex_buffer: wgpu::BufferSlice = ...;
4pass.set_pipeline(&mask_pipeline);
5pass.set_vertex_buffer(0, vertex_buffer);
6// Draw the mask
7pass.draw(0..3, 0..1);
The mask_pipeline has the following stencil state:
1let stencil_state = wgpu::StencilFaceState {
2    compare: wgpu::CompareFunction::Always,
3    fail_op: wgpu::StencilOperation::Keep,
4    depth_fail_op: wgpu::StencilOperation::Keep,
5    pass_op: wgpu::StencilOperation::IncrementClamp,
6};
Because the stencil buffer is initialized with zeroes, the draw above will increment the stencil values which are covered by the mask to 1. The are incremented because the pass operation IncrementClamp is used.
Now let’s draw the complex shape:
1let mut pass: wgpu::RenderPass = ...;
2let mut pipeline: &wgpu::RenderPipeline = ...;
3let mut vertex_buffer: wgpu::BufferSlice = ...;
4pass.set_pipeline(&pipeline);
5pass.set_vertex_buffer(0, vertex_buffer);
6pass.set_stencil_reference(1);
7// Draw the complex shape
8pass.draw(0..1000, 0..1);
The pipeline has the following stencil state:
1let stencil_state = wgpu::StencilFaceState {
2    compare: wgpu::CompareFunction::Equal,
3    fail_op: wgpu::StencilOperation::Keep,
4    depth_fail_op: wgpu::StencilOperation::Keep,
5    pass_op: wgpu::StencilOperation::Keep,
6};
This state never changes the stencil buffer, but only draws pixels which have a 1 in the stencil buffer. The reason for this is that we set the stencil reference value to 1 with pass.set_stencil_reference(1), and we went with the Equal compare function.
This technique can be used in vector map rendering, where quadratic tiles of geographic data are drawn. The tiles contain vector graphics which can extend beyond the boundaries of a tile. By using squares as a mask it is possible to clip the tiles. An example project which uses clipping is maplibre.
Other Applications for Stencil Testing
Other usages for stencil testing can be discovered here. It can be used for example to outline objects.