If is possible to flash a new firmware from Linux or BSD on an APU embedded system. If the system no longer boots because the board war bricked during a firmware upgrade then you have to flash the flash memory directly over SPI. In my case I had to flash an MX25L1606E on an APU1D.
I already described how to flash the firmware using a live USB stick with TinyCore Linux in a previous post.
Requirements
- Raspberry PI (version does not matter)
- Some spare pin headers and soldering iron
- Jumper wires
- Broken APU ;)
Setup SPI on Raspberry PI
First you have to setup SPI on the Raspberry PI. As this will change over the time I just want to link you to the official documentation. Usually you can do this by using the command-line tool raspi-config.
After the setup you should see the device /dev/spidev0.0 and the kernel module spi_bcm2835 should be loaded.
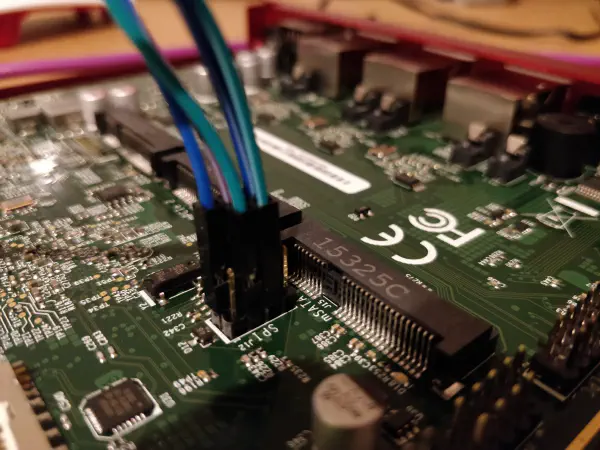
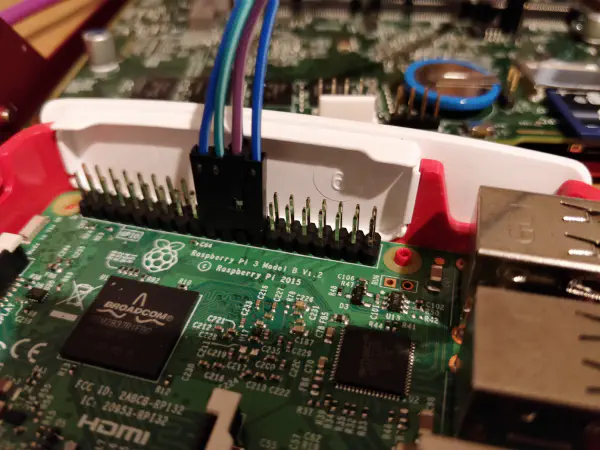
Connect the PI to the board
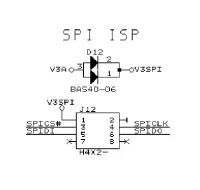
Connecting the SPI bus to the board can differ between APUs. Generally it is best to consult the pin layout of the Raspberry PI and the schematics from PCEngines. The schematics are always linked on the APU product page. For example for the APU1D it can be found here. If you carefully look through the pages you will find the pin layout for the SPI header J12:
If there is no pin header soldered on the PCB, then you have to do this manually.
A pretty good layout overview for the Raspberry PI SPI header can be found here. Connect the PI and the APU using the following table. You mustn’t connect the 3.3V pins!
| PI PIN | APU PIN | Description |
|---|---|---|
| SPI0 SCLK | SPICLK | Serial Clock (output from master) |
| SPI0 MOSI | SPIDO | Master Output, Slave Input (DO, output from master) |
| SPI0 MISO | SPIDI | Master Input, Slave Output (DI, output from slave) |
| SPI0 CE0 | SPICS | Chip Select (active low, output from master) |
After connecting the PI and the APU you have to start the APU in S5 (soft-off) mode. You can do this by pulling the power pin on the J2 to ground during boot.
Here are two pictures from the process. Unfortunately I went which a pretty bad color combination :(
Flash Firmware
After connecting to your PI over SSH and downloading a recent mainline firmware from the official PCEngine downloads page you can start to flash the APU via SPI. First install the flashrom package by executing:
1apt install flashrom
My first test using flashrom -p linux_spi:dev=/dev/spidev0.0 failed as I did not set the spispeed:
1...
2Using clock_gettime for delay loops (clk_id: 1, resolution: 1ns).
3Found Generic flash chip "unknown SPI chip (RDID)" (0 kB, SPI) on linux_spi.
After setting the speed:
1flashrom -p linux_spi:dev=/dev/spidev0.0,spispeed=16000
You can observe that the chip gets recognized properly:
1...
2Using clock_gettime for delay loops (clk_id: 1, resolution: 1ns).
3Found Macronix flash chip "MX25L1605" (2048 kB, SPI) on linux_spi.
4Found Macronix flash chip "MX25L1605A/MX25L1606E/MX25L1608E" (2048 kB, SPI) on linux_spi.
5Found Macronix flash chip "MX25L1605D/MX25L1608D/MX25L1673E" (2048 kB, SPI) on linux_spi.
6Multiple flash chip definitions match the detected chip(s): "MX25L1605", "MX25L1605A/MX25L1606E/MX25L1608E", "MX25L1605D/MX25L1608D/MX25L1673E"
7Please specify which chip definition to use with the -c <chipname> option.
Finally we select the correct chip, create backups and compare check sums before we overwrite the flash.
1flashrom -p linux_spi:dev=/dev/spidev0.0,spispeed=16000 -c MX25L1605A/MX25L1606E/MX25L1608E -r old.bin
2flashrom -p linux_spi:dev=/dev/spidev0.0,spispeed=16000 -c MX25L1605A/MX25L1606E/MX25L1608E -r old1.bin
3md5sum old.bin
4md5sum old1.bin
If the two check sums are the same then we can verify and flash the firmware.
1wget https://3mdeb.com/open-source-firmware/pcengines/apu1/apu1_v4.11.0.5.rom
2wget https://3mdeb.com/open-source-firmware/pcengines/apu1/apu1_v4.11.0.5.SHA256
3sha256sum -c apu1_v4.11.0.5.SHA256
4wget https://3mdeb.com/open-source-firmware/pcengines/apu1/apu1_v4.11.0.5.SHA256.sig
5wget https://raw.githubusercontent.com/3mdeb/3mdeb-secpack/master/customer-keys/pcengines/release-keys/pcengines-open-source-firmware-release-4.11-key.asc
6gpg --import pcengines-open-source-firmware-release-4.11-key.asc
7gpg --verify apu1_v4.11.0.5.SHA256.sig
8flashrom -p linux_spi:dev=/dev/spidev0.0,spispeed=16000 -c MX25L1605A/MX25L1606E/MX25L1608E -wapu1_v4.11.0.5.rom
If we trust the 3mdeb/3mdeb-secpack GitHub repository then we can be sure that the firmware is legit!
1...
2Using clock_gettime for delay loops (clk_id: 1, resolution: 1ns).
3Found Macronix flash chip "MX25L1605A/MX25L1606E/MX25L1608E" (2048 kB, SPI) on linux_spi.
4Reading old flash chip contents... done.
5Erasing and writing flash chip... Erase/write done.
6Verifying flash... VERIFIED.
That’s it, we successfully flashed a firmware image using a Raspberry PI! I hope you were able to save some hardware from the trash!